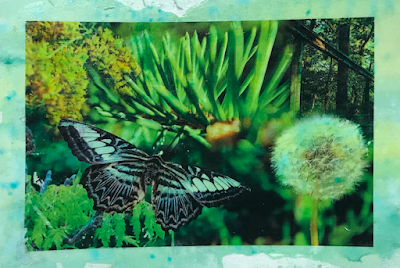
Watercolor Transfer Print
In graphic design, we created watercolor transfer prints. Here's how we did it.
First, we chose our favorite project from the year so far, and opened it in Adobe Photoshop. We cropped it to be a bit smaller, and made a black and white copy. This is just so we would have two to chose from, whichever you preferred in the end. Next, we printed them out and cut them so they would have a rim of blank paper about half an inch thick all the way around your project. Then, we took a sheet of watercolor paper, tore it in half, and watercolored them how we saw fit. Once the watercolors dried, we took our picture and spread a thick layer of mod podge onto the ink. You should just barely be able to see your picture through the mod podge. Leave the blank rim around the picture clean, don't coat it so you can hold it. Place the picture, mod podge side down, onto the watercolor. Spread it around and flatten it out a little; does not have to be precise, just starting you off. Next, take a squee gee and flatten the picture all the way down, scraping out all excess mod podge. Be careful to not get any mod podge on the blank back side of you picture. When you get all the mod podge out, leave it to dry. Once it's fully dry, wet your fingers and start to rub at one of the corners. Once the paper starts peeling up, keep rubbing across the whole paper until it has all come off. Let it dry and rub it again to make sure you got all of the paper fuzzies. Brush with poly acrylic, and you're finished!
My Project
Overall, I am very happy with how mine turned out. I think it looks pretty good, but in some areas I started to rub away the water color paper. I think I also got a little bit of mod podge on the back, because there are some areas where it was difficult to get off, or I couldn't get off all together.


Comments
Post a Comment